Saturday, April 12, 2008
How to make A Onion Dome
| How to make three types of Onion Domes: simple colored, relieved colored, relieved spiral colored |
|

SIMPLE AND RELIEVED COLORED ONION DOME

In the above picture are presented the 12 steps for making a Simple (Step from 1 to 5) and Relieved Colored dome (Step from 1 to 12). The example shows how to obtain a 10 sectors relieved dome, where each sector presents a semicircular section. In this paper I will emphasize some critical points regarding the various steps.
STEP 1: in order to obtain the "generating outline" of the dome it is recommended to set the SketchUp in the FRONT mode and with PERSPECTIVE PARALINE, and - still better - to draw the outline over a rectangle textured with a proper (orthogonal) photo of the dome
STEP 3: before using the FOLLOW ME tool, we have to erase the area!
STEP 4: the FOLLOW ME tool has (in my opinion) a little trouble in the usability...; in any case I apply this simple procedure: a) selecting the polygon to be followed, b) clicking the FOLLOW ME tool and then c) clicking at the generating area center
STEP 6: in order to manage the dome object, and erasing all sectors but one, we have to select the whole dome, use the SOFTEN EDGES panel and force 0 degrees
STEP 8: in order to draw the semicircles it might be helpful to use a working structure (for instance rectangualar shapes parallel to xy plane for inscribing the semicircles...); of course these working structure will be later removed
STEP 10: normally the drawed lines generate rectangles, but in a few cases they generate triangles
SETP 11: for optimization purpose, it is recommandable to erase all surfaces and internal lines not strictly necessary; for a more pleasant look we can use the SOFTEN EDGES panel and force a proper degree value
STEP 12: in order to obtain the whole dome it's sufficient to select the sector (perhaps GROUPed) and to apply a ROTATION with COPY (clicking over the TOTATE tool and then on CAPS), digiting in the VCB (Value Control Box) the proper number of sexagesimal degrees + ENTER (in our example 36) and immediatly after the repetition factor followed by x + ENTER (in our example 9x
Obviously the work will result more accurate and pleasant when more edges are utilized for the polygons in the STEP 1,2,8.
SPIRAL RELIEVED COLORED ONION DOME
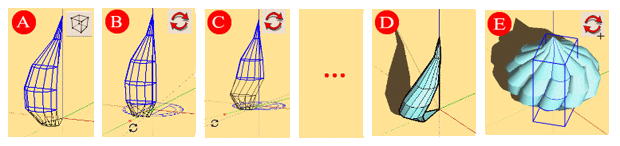
The following picture shows the steps I utilized to obtain a dome like the above but with a spiral effect.
In WIREFRAME mode (A), you select all planes over the first (including the first) and then you rotate the selected structure to a proper number of sexagesimal degrees (in our example 10) using the VCB (see STEP 12 above, without repetition factor). Then you can repeat the procedure for the second, third, and so on... planes, obtaining a very interesting generating sector (D). The whole dome is obtained by ROTATION with COPY (see again STEP 12).
There is a SketchUp file whit the example: MAKE_DOME.skp (SketchUp 6).
.

Labels: -Make_Onion_Dome
# posted by Arrigo Silva @ 4/12/2008 12:25:00 AM 
![]()
