Sunday, December 27, 2009
Faces and Sides
| Are all the sides of a face equal to each other? No, they aren't, and may be important how they are oriented... |
|
 you can download the model used for this Tutorial in 3Dwarehouse by clicking on icon above
More a model is complex, more we feel the need to proceed with order and method. Correctly orient all faces of a model can be a successful way of achieving better control, save time and build a more robust model (eg - I think - convertibile with fewer disadvantages in other 3D modeling systems). In a professional model the external surfaces are the right sides and the observer should not see any back sides!
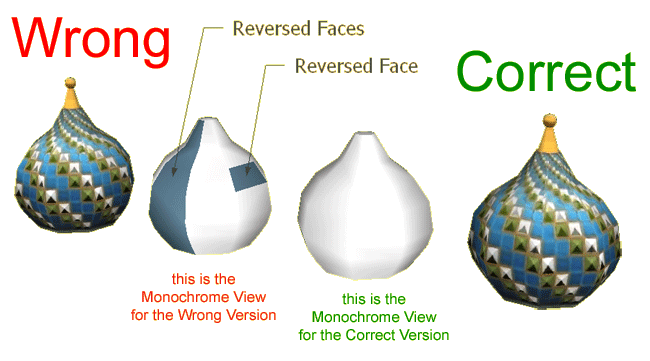
Furthermore, if you produce a model with the faces correctly oriented, also ensures a right display in Google Earth. Consider the domes shown in the following figure: the left one has a sectore and a single face with the sides reversed, while the right has all the faces are properly oriented (the two intermediate domes show you what you can see in monochrome display mode with View> Face Style> Monochrome)
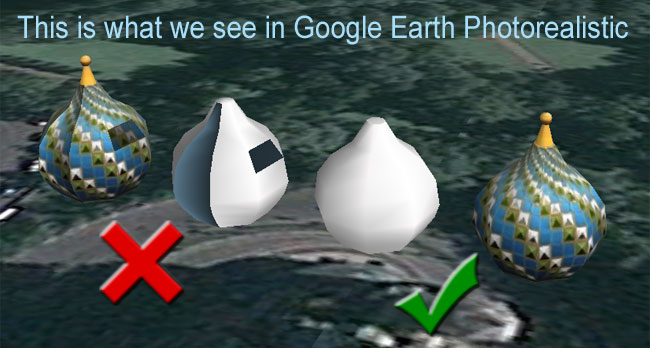
And now consider the following figure that shows you the corresponding view in Google Earth!
In this tutorial - based on my personal experiences - we will discuss the following topics:
A) the two side of a face: FRONT and BACK
B) how to detect the orientation of the face sides in a model
C) how to test the difference in behavior between the sides FRONT and BACK
A) FRONT AND BACK SIDE OF A FACE
In SketchUp a FACE has two SIDES: a 'right' side, called FRONT SIDE (think of it as CLEAR!) and 'reverse' size, called BACK SIDE (think of it as DARK or BLACK!).
Often the modellers do not pay attention to the difference between the two types of SIDE, but in some cases they have very different behaviors!
B) HOW TO DETECT THE ORIENTATION OF THE SIDES
It is sufficient set the display in monochrome style, and also properly setting the Shadow values for better appreciate the differences.

In this example we can easily detect the FRONT and BACK SIDES.
C) TESTING THE DIFFERENCE
By following the steps described below, you can realize yourself the difference in behavior, and find the best way to use the features of the sides in the construction of your models!
Warning: for teaching purposes, in this example I used a Google Component GeodesicDome02 (Window>Components choosing Shapes>GeodesicDome02) but you can use any other form or model
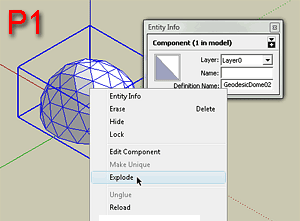 I imported a shape and then exploded it | 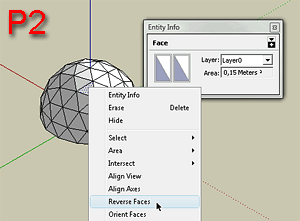 Now select one face, and then reverse it |
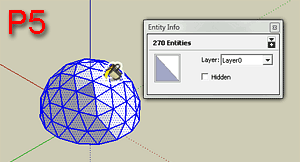
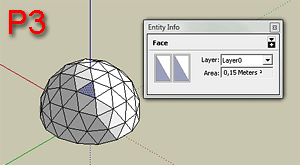 Here we can see the face reversed |  Select all faces in our dome (eg using Edit>Select All, or Ctrl-A) |
 Then choose the bucket tool with red color, and get ready to spread on the dome starting from a triangle different from that previously selected | 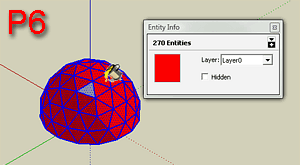 Here is the result, which perhaps may surprise you - this will make you understand the difference |
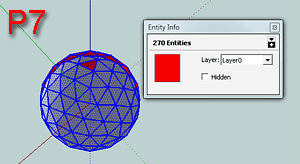 If you still have doubts, try to see the dome from below! If you still have doubts, try to see the dome from below! |
(You can download the model with the hemisphere clicking here)
Do other experiments, for example painting the triangle initially selected with the color yellow ... etc ...
Look carefully, from time to time, what appears on the panel INFO (from Window>Entity Info) because it shows the characteristics of the two sides, on the left for the FRONT SIDE and on the right for BACK SIDE!
*
.
Labels: -Faces_And_Sides
# posted by Arrigo Silva @ 12/27/2009 09:22:00 PM 
Comments:
<< Home
I've been using SketchUp since 2007 and it's so nice, finally, to understand the significance of the two sides of a face in a SU model, particularly for Google Earth models. Your explanation of the subject is perfect and beautifully clear. Thank you.
# posted by  : July 14, 2010 at 9:18 AM
: July 14, 2010 at 9:18 AM << Home
![]()

Post a Comment