Friday, March 19, 2010
How To Optimize Texture Size And Quality
*
| In this tutorial I want to tell us an interesting experiment I did with the textures: this experiment, that you can easily reproduces with your own pictures, will give you valuable guidance on how to best manage texures of your models, improving the quality and even saving space in filesize! | IMPORTANCE |
DIFFICULTY |
 you can download the model used for this experiment in 3Dwarehouse by clicking on icon above


Carefully examining several models in 3dwarehouse, I have noticed that very often the skp files are unnecessarily too weight ... because of the excessive size of the images used for textures! In fact, the images are often unpleasant things – or bad and ugly beast - for most modelers, because they don’t know how to treat them, and believe that bigger images cause automatically higher quality. My experiment would dispel this prejudice and give you some useful guidance to tame these wild animals.
PREPARING THE EXPERIMENT
Step 1. OBTAINING 20 DIFFERENT PICTURES (USING A GRAPHIC TOOL)
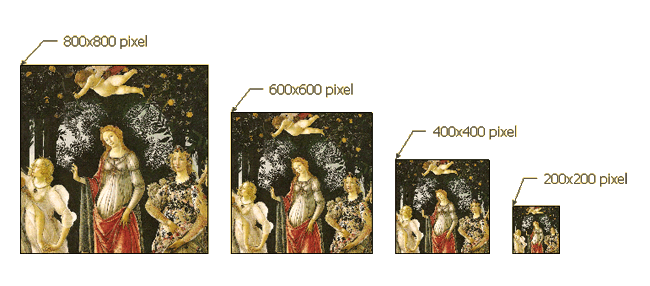
Before building the model skp, I uploaded into my Photoshop Elements an image of the famous, full of grace picture “La Primavera” from wich I’ve carved a square detail of about 900x900 pixels. From this square detail I have gradually reduced the size, first at 800x800, 600x600, 400x400 and 200x200 pixels.
From each image thus obtained I created 5 jpeg files, with different quality factors, id est with 0 = minimal, 10 = low, 30 = average, 60 = high and 100 = maximum quality. For the 200x200 picture I’ve created 5 files: P200_00.jpg, P200_10.jpg, P200_30.jpg, P200_60.jpg, P200_99.jpg with these sizes: 5 kb, 7 kb, 11 kb, 19 kb, 56 kb For the 400x400 picture I’ve created 5 files: P400_00.jpg, P400_10.jpg, P400_30.jpg, P400_60.jpg, P400_99.jpg with these sizes: 18 kb, 23 kb, 37 kb, 70 kb, 206 kb And so on… Step 2. PAINTING THE FACES IN THE MODEL (IN SKETCHUP)
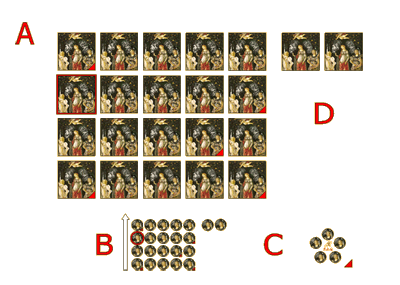 The model used for the experiment was divided into four sections:
Section A
the 20 squares are painted using the 20 textures from the files created in Step 1
Section B
here are the details corresponding to each square of A
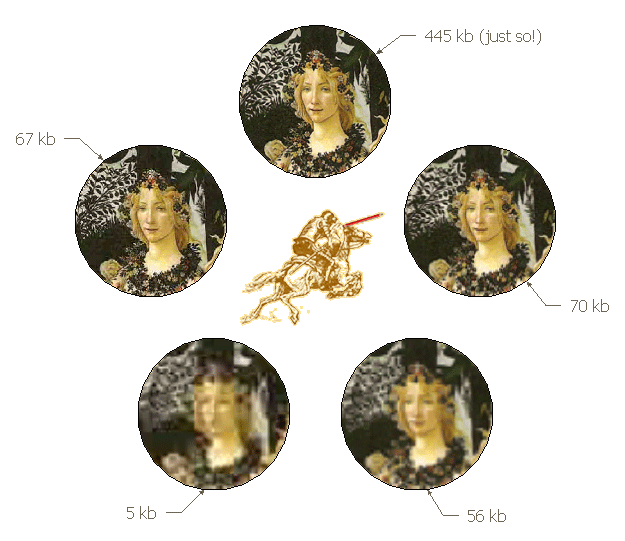
Section C
this is THE HEART of the experiment, in wich are reported a few significative specimens of the B identified by a little red triangle
Section D
this is an appendix for a special case
The model used for the experiment was divided into four sections:
Section A
the 20 squares are painted using the 20 textures from the files created in Step 1
Section B
here are the details corresponding to each square of A
Section C
this is THE HEART of the experiment, in wich are reported a few significative specimens of the B identified by a little red triangle
Section D
this is an appendix for a special case
Now our environment is OK and we can examine, slowly and quietly, our wild animals…
DISCUSSING THE EXPERIMENT
I suggest you to begin from Section C - What is the pictures quality? What is the worst and what the best picture? What is the corresponding weight in kbytes of corresponding textures? The assumption “The greater the size of the JPEG file, the better the image quality?” is true, isn’t it? Or not!?
 Now we can begin to make some hypothesis, and we can check them on the section B which also shows, neatly, all other details.
Here we note that each time we board a row there is a definite breakthrough in quality, while the other hand, within the same line, the improvement in quality does not seem too equally obvious.
At this point I advise you to consult and carefully look the Section A, in which are clearly marked on all the characteristic elements of the file used for texturing the squares.
Finally, I suggest you carefully examine the different textures on the rows and columns carrying out all possible comparisons – closely and at medium and long distances.
Now we can begin to make some hypothesis, and we can check them on the section B which also shows, neatly, all other details.
Here we note that each time we board a row there is a definite breakthrough in quality, while the other hand, within the same line, the improvement in quality does not seem too equally obvious.
At this point I advise you to consult and carefully look the Section A, in which are clearly marked on all the characteristic elements of the file used for texturing the squares.
Finally, I suggest you carefully examine the different textures on the rows and columns carrying out all possible comparisons – closely and at medium and long distances.
RECOMMENDATIONS AND CONCLUSIONS
The first conclusions are:
|
|
 When I look the texture on a portion of my screen of 500x500 pixels, to get a good perceived quality the texture must be at least approximately 500x500 pixels - but if my texture is only 100x100 pixels, the perceived quality is still poor, even when the JPEG quality was highest! And again, if my texture is 2500x2500 pixels, the perceived quality is likely to be only a bit better (and I believe... but it's worth it!?) ...
Of course if I wanted to look the picture more closely, it could be an advantage to have a larger image - and this is natural, because on my screen area of 500x500 pixels I should not see the WHOLE image but only a PART!
At this point it remains to answer a question that some of you probably will have done:
“But if I look a texture on my screen 500x500 pixels and I have an image of 250x250 pixels, I can try to enlarge it (with Photoshop) up to 500x500 or even 1500x1500... Can I!?”
The Section D helps you to answer this question!
A final note: Do not blindly trust what I have written in this note - but trust the method that I have proposed experimenting from time to time on the textures of your models… and trying to tame your ugly beast.
Have a good ride and… save space!
RELATED ARTICLES
- Optimizing a SketchUp model for Google Earth on sketchup.google.com/support
When I look the texture on a portion of my screen of 500x500 pixels, to get a good perceived quality the texture must be at least approximately 500x500 pixels - but if my texture is only 100x100 pixels, the perceived quality is still poor, even when the JPEG quality was highest! And again, if my texture is 2500x2500 pixels, the perceived quality is likely to be only a bit better (and I believe... but it's worth it!?) ...
Of course if I wanted to look the picture more closely, it could be an advantage to have a larger image - and this is natural, because on my screen area of 500x500 pixels I should not see the WHOLE image but only a PART!
At this point it remains to answer a question that some of you probably will have done:
“But if I look a texture on my screen 500x500 pixels and I have an image of 250x250 pixels, I can try to enlarge it (with Photoshop) up to 500x500 or even 1500x1500... Can I!?”
The Section D helps you to answer this question!
A final note: Do not blindly trust what I have written in this note - but trust the method that I have proposed experimenting from time to time on the textures of your models… and trying to tame your ugly beast.
Have a good ride and… save space!
RELATED ARTICLES
- Optimizing a SketchUp model for Google Earth on sketchup.google.com/support
| If you know of other interesting articles on this topic, or if you have any remark or comment, please use the COMMENTS area to share with us all your experiences! |
Labels: -Textures_Optimizing
# posted by Arrigo Silva @ 3/19/2010 10:59:00 AM 
Comments:
<< Home
Being a Icelander I would like share an old Icelandic saying which reads: "It is hard to teach an old dog to sit". Well, I am not a dog but I am getting older. One can also assume that old men and old dogs do share some similar problems. Shortly after your blog "How To Optimize Texture Size And Quality" appeared on the Internet I did read it, study it, and I did understand its significance. But, somehow I kept on using my old way of resizing my textures. It is not until now, having been reminded, that I will change my working procedures. A good model is not, just a pretty model of a interesting structure. A good model has to be a efficient model.
Many thanks Arrigo Silva.
St. Pall
Many thanks Arrigo Silva.
St. Pall

You`r doing an outstanding work!!! thank you for cognitive tutorials!
# posted by  : July 11, 2011 at 7:15 PM
: July 11, 2011 at 7:15 PM << Home
![]()

Post a Comment